

The Girlzx
She's a January Baby. Going through life the best she can. Little anecdotes of life as she takes another breath for another day.
Events
- AFA'14
- Christmas Cosfest' 14
- J-Obsession 2015
- Charaexpo 2015
- Cosfest 2015
- EOY 2015
- STGCC 2015
- Sports Fest 2015
- Gamestart 2015
- Anime Festival Asia 2015
- Christmas Cosfest 2015
- J-Obsession 2016
- Doujima 2016
- Charaexpo 2016
- Cosfest 2016
- STGCC 2016
- Sports Fest 2016
- GameStart 2016
- Costime! Aeon Mall, Johor
- Idolicious 2016
- Anime Festival Asia 2016
- EOY 2016
- Tampines Youth Fest 2016
- Comic Fiesta 2016
- Cosfest 2017
- Doujima 2017 - PowerUp 2017
- Yuri On Ice-only event 2017
- STGCC 2017
- Charaexpo 2017
- GameStart 2017
- Idolicious 2017
- AFA 2017
She Loves Her "ABoyFriends"!
~Inuyasha~
~Yugioh(cute Yugi & HanSome Yugi)~
~Yuu Kanda~D.Gray-Man
~Uchiha Itachi~Naruto
~Gaara of the sand~Naruto
~Neji~Naruto
~Tieria Erde~Gundam00
~Casshern~CasshernSINS
~Cloud~FinalFantasy7
~Noctis Lucis Calum~FinalFantasy15
~Lelouch~CodeGreass
~Shun~Bakugan
~Zuko~Avatar the last airbender
~Yzak Joule~GundamSeed
~Zeheart~Gundam AGE
~Levi Ackerman~Attack On Titan
~KagamiTaiga~Kuroko No Basuke
~Frau~07-Ghost
~HaradaSanosuke~Hakuoki
But to be honest I'd rather see my boys being together. :D
She Has Her BIASES
♥Tokio Hotel
Bill Kaulitz . Tom Kaulitz . Gustav Schafer . Georg Listing
♥The WANTED
Tom Parker . Max George . Siva Kaneswaran . Jay McGuiness . Nathan Sykes♥
♥ One Direction
Louis Tomlinson♥ . Zayn Malik . Liam Payne . Niall Horan . Harry Styles
♥District 3
Dan Ferrari-Lane . Michael Parsons♥ . Greg West
♥Palaye Royale
Sebestian♥ . Remington . Emerson
♥JEdward
♥Ed Sheeran
♥SHINee
Lee JinKi . Kim JongHyun♥ . Choi MinHo . Kim KiBum . Lee TaeMin
♥B.A.P.
Bang YongGuk . Kim HimChan♥ . Jung DaeHyun . Yoo YoungJae . Moon JongUp♥ . Choi JunHong ZELO
♥NU'EST
Aron Kwak . Kim JongHyun JR . Kang DongHo BaekHo♥ . Hwang MinHyun . Choi MinKi Ren
♥B1A4
Jung Jinyoung . Shin Dongwoo CNU . Lee Junghwan Sandeul . Cha Sunwoo Baro . Gong ChanSik ♥
♥SEVENTEEN
Choi SeungCheol . Jang DoYoon . Yoon Junghan . Hong Jisoo . Wen JunHui . Kwon SoonYoung . Jeon WonWoo . Lee JiHoon . Yao MingMing . Lee SeokMin . Kim MinGyu . Boo SeungKwan . Chwe Hansol . Lee Chan . Shin DongJin . Samuel .
♥5SecondsOfSummer
Ashton Irwin . Michael Clifford . Calum Hood . Luke Hemmings
♥TheVamps
♥Boyce Avenue
♥The Script
weeee
Associates & Links
Kak Na
Kak Myra
Abg Hydher
Fiona
Jun Ao
Teacher Mdm Noor
Little Joanne
Jung Min
Hu Yu
Farah
Joey
Pearlie
Syahirah
Vanessa
Victoria
Wulandari
Zer Yee
Khairul
Jason
Haziq
Ding Wei
Haffidz
Rifka
Brenda
Nabila
Erra
Fang Ting
~~~~~
Pri SchMT ClassBlog
Guild blog
Pri Sch 6C^1'08 Class blog
NAS 1R7 Class Blog
My History
January 2006
February 2006
March 2006
April 2006
May 2006
June 2006
July 2006
August 2006
September 2006
October 2006
November 2006
December 2006
January 2007
February 2007
March 2007
April 2007
May 2007
June 2007
July 2007
August 2007
September 2007
October 2007
November 2007
December 2007
January 2008
February 2008
March 2008
April 2008
May 2008
June 2008
July 2008
August 2008
October 2008
November 2008
December 2008
January 2009
February 2009
March 2009
April 2009
May 2009
June 2009
August 2009
September 2009
October 2009
November 2009
December 2009
February 2010
March 2010
June 2010
July 2010
September 2010
November 2010
December 2010
November 2011
February 2012
April 2013
December 2013
March 2015
April 2015
May 2015
August 2015
September 2015
October 2015
November 2015
December 2015
May 2016
August 2016
October 2016
March 2017
October 2017
November 2017
Saturday, November 07, 2015
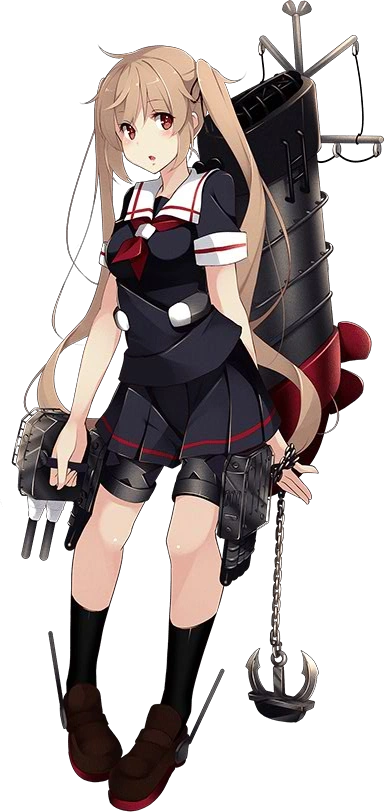
[HOW TO] Murasame Kai Props
7 November 2015
Finally, I shall share with you the ways I made Murasame's props.
The materials needed will be highlighted in yellow so do look out!
Also, the measurements and what not will be at the end of the post so go there to find them~
Let's begin!
.full.1650142.jpg)


This was all I did for the propeller: I took an empty tissue roll cut to the desired length (a bit more so that I can later slot into the main body of the back thingy), made a cone out of paper and cut out the planes from cardboard-- the white paper parts are the planes.
As for the fin at the bottom, I just measured accordingly, made a newspaper cut out to align on the actual main body to see if the fin makes sense before cutting out from the cardboard.
After this, I paper mache'd everything! This is to smooth out the dents on the main body, add more solidity to the structure and also to make sure that the pieces stay together. I put about 3 - 4 layers of paper mache -- just enough to hold the structure and not to make the structure heavy. For the more flimsy parts (like the fins and the propeller) I put on more layers until it is stiff enough when dried.
Next to do was the details. For the wiring and the grills on the main body, I used the gardening wires I bought from Daiso. The one I bought was the blue one:

And then using the cut toothpick, I poke through the same hole left by the needle.
Finally, I shall share with you the ways I made Murasame's props.
The materials needed will be highlighted in yellow so do look out!
Also, the measurements and what not will be at the end of the post so go there to find them~
Let's begin!
1) Reference pictures!!!! I mainly work around the official pictures I found on Google. Thank goodness there was the rainy event where Murasame turned around and we could see the behind of the huge-ass props she has at the back haha...
2) Sketching out!
For Murasame, I identified that I'll have to make :
- The antennae thingy on her shoes
- The straps thingy at her thighs
- The canon thing attached to the straps on her thighs
- The canon thingy on her right hand
- The huge-ass thing at her back
- The anchor on her left hand
Unfortunately I have no idea where I placed the sketches I made hahaha...
3) Prototyping!
I didn't take picture of the... prototyping stage...
But basically there was a lot of newspaper, white paper, pencil, penknife and scissors to make a paper-prototype of the product. This is an example of the propeller prototype:
4) Cutting of material
Such coincidence that my neighbour bought new furniture from Ikea and left their cardboard outside at the corridor conveniently (obviously not for me) HAHA
So being the cheap cosplayer I am (since I lost a lot of money from the wig and costume purchasing :')), I decided to keep my foam and use the cardboard so readily laid down for me instead. xD
With the newspaper prototype, lay the newspaper parts on the cardboard and cut! :>
5) Sticking the props together!
Because I was working with cardboard, I decided to use masking tape to literally hold all my props together. I gave up on cloth tape because it doesn't stick and stay in the form I want it to go (it is stubborn in keeping its straight form) and duct tape ruins everything if you paste it wrongly haha... Besides, masking tape is made of an almost-paper-ish material so it goes well with cardboard's texture and works fine if I want to paint over it.
So from now on let's see the parts separately. Let's start with the easier ones:
Antennae thingy on her shoes
Essentially, I just used a pair of chopsticks, black foam and tape.. and I am done.....
On how to attach this to the shoes, I was using a general Japanese school shoes that I will also be using for other cosplays so I didn't want to permanently put it there, so I used tape to tape the parts to the shoe hahaha...
The straps thingy at her thighs
Similar to the antenna thingy on her shoes, I used foam and cut the out in this way:
At the ends of the straps, I glued AND sew in strips of velcro so that it will attach to my tights afterwards.
Anchor
I did the anchor last because I actually forgot that it was there.
Draw out the prototype of the anchor using paper, pencil, scissors and tape. Identify out the section of the anchor because if you noticed, the anchor is not as flat as a board. For me, I identified 4 different parts:
1, 3 & 4 are to be on the same plane while 2 will be on the perpendicular plane. I'm not sure if you get me but here's the final product for you to see what I mean haha:
As you can see, the part for 2 is perpendicular to the rest of the anchor. I used hard foamboard -- something like Styrofoam but it is definitely not Styrofoam because it doesn't have air spaces at all. If you got to ArtFriend, it is the huge blue board that has 2 thickness: 60mm or 12mm. It is harder and I could also sand the foam! Ah yes I used sandpaper to even out any ugly parts that I cut and also to have some curvature for the anchor so that it doesn't look too sharp. I stick the parts together carefully with glue gun (NEVER UHU GLUE!!). Finally, I tied in the plastic chains, I bought from Daiso or you can also find them at most hardware shops, through the loop at the end of the anchor.
Huge-ass thingy at the back

This is the last thing I made for Murasame but I am gona put this first because the photo was uploaded here hahaha...
So I used the board I found lying outside my house to make the body of the thingy and also the top and bottom "caps".
For the main body, when cutting the board, I made sure that the part I was going to roll (because the thingy is essentially a chute of a ship) was the side of the board where the lines of the cardboard are horizontal instead of vertical.
Like this, in this orientation:
This is to ensure that the surface of the chute has a smoother curve rather than a dented and squared surface.
I did it wrongly the first time so the cardboard surface ended up this way:
See the horizontal lines on the body? Made a mistake and thus, ugly.
But basically there was a lot of newspaper, white paper, pencil, penknife and scissors to make a paper-prototype of the product. This is an example of the propeller prototype:
 |
| The prototype of the propeller. You will see this image again later hahaha... |
Such coincidence that my neighbour bought new furniture from Ikea and left their cardboard outside at the corridor conveniently (obviously not for me) HAHA
 |
| Kind neighbours :') |
So being the cheap cosplayer I am (since I lost a lot of money from the wig and costume purchasing :')), I decided to keep my foam and use the cardboard so readily laid down for me instead. xD
With the newspaper prototype, lay the newspaper parts on the cardboard and cut! :>
5) Sticking the props together!
Because I was working with cardboard, I decided to use masking tape to literally hold all my props together. I gave up on cloth tape because it doesn't stick and stay in the form I want it to go (it is stubborn in keeping its straight form) and duct tape ruins everything if you paste it wrongly haha... Besides, masking tape is made of an almost-paper-ish material so it goes well with cardboard's texture and works fine if I want to paint over it.
So from now on let's see the parts separately. Let's start with the easier ones:
Antennae thingy on her shoes
 |
| Antenna thingy on her shoe |
Essentially, I just used a pair of chopsticks, black foam and tape.. and I am done.....
 |
| Prototype of the Antenna thingy on her shoes |
On how to attach this to the shoes, I was using a general Japanese school shoes that I will also be using for other cosplays so I didn't want to permanently put it there, so I used tape to tape the parts to the shoe hahaha...
The straps thingy at her thighs
Similar to the antenna thingy on her shoes, I used foam and cut the out in this way:
 |
| Prototype of the straps thingy at her thighs |
At the ends of the straps, I glued AND sew in strips of velcro so that it will attach to my tights afterwards.
Anchor
I did the anchor last because I actually forgot that it was there.
 |
| Anchor on her left hand |
Draw out the prototype of the anchor using paper, pencil, scissors and tape. Identify out the section of the anchor because if you noticed, the anchor is not as flat as a board. For me, I identified 4 different parts:
 |
| Prototype of the anchor on her left hand |
1, 3 & 4 are to be on the same plane while 2 will be on the perpendicular plane. I'm not sure if you get me but here's the final product for you to see what I mean haha:
 |
| Final product of the anchor on her left hand! |
As you can see, the part for 2 is perpendicular to the rest of the anchor. I used hard foamboard -- something like Styrofoam but it is definitely not Styrofoam because it doesn't have air spaces at all. If you got to ArtFriend, it is the huge blue board that has 2 thickness: 60mm or 12mm. It is harder and I could also sand the foam! Ah yes I used sandpaper to even out any ugly parts that I cut and also to have some curvature for the anchor so that it doesn't look too sharp. I stick the parts together carefully with glue gun (NEVER UHU GLUE!!). Finally, I tied in the plastic chains, I bought from Daiso or you can also find them at most hardware shops, through the loop at the end of the anchor.
Huge-ass thingy at the back

This is the last thing I made for Murasame but I am gona put this first because the photo was uploaded here hahaha...
So I used the board I found lying outside my house to make the body of the thingy and also the top and bottom "caps".
For the main body, when cutting the board, I made sure that the part I was going to roll (because the thingy is essentially a chute of a ship) was the side of the board where the lines of the cardboard are horizontal instead of vertical.
Like this, in this orientation:
 |
| photo by: http://kingabritschgi.deviantart.com |
This is to ensure that the surface of the chute has a smoother curve rather than a dented and squared surface.
I did it wrongly the first time so the cardboard surface ended up this way:
 |
| Main Body in its raw-est form |
See the horizontal lines on the body? Made a mistake and thus, ugly.
It is easier to roll it the other way because when we bend the cardboard, the inner surface of the cardboard can slot itself into the gaps of the lines but it is because of this that there will be uneven bends for some will fold more than the others. It will take more effort to bend it in the way I did above but its much smoother than when I rolled the cardboard the other way haha...
After making the base, I will need to add in the other details and parts of the prop.
This was all I did for the propeller: I took an empty tissue roll cut to the desired length (a bit more so that I can later slot into the main body of the back thingy), made a cone out of paper and cut out the planes from cardboard-- the white paper parts are the planes.
|
| The prototype of the propeller found at the bottom of the main body thingy The white paper part are to be cardboard instead. |
As for the fin at the bottom, I just measured accordingly, made a newspaper cut out to align on the actual main body to see if the fin makes sense before cutting out from the cardboard.
I attached all of them together with masking tape of course.
 |
| How the main body would look like with the propeller and the fin attached to it |
After this, I paper mache'd everything! This is to smooth out the dents on the main body, add more solidity to the structure and also to make sure that the pieces stay together. I put about 3 - 4 layers of paper mache -- just enough to hold the structure and not to make the structure heavy. For the more flimsy parts (like the fins and the propeller) I put on more layers until it is stiff enough when dried.
 |
| Paper mache ~~ It takes about a day or so to dry up, depending on the air circulation around it and the humidity too |
Next to do was the details. For the wiring and the grills on the main body, I used the gardening wires I bought from Daiso. The one I bought was the blue one:

So now the problem was how to attach the wires to the main body. I went around the house searching for inspiration... and finally came across.... the toothpicks.
Before anything else, I measured where the 3 wires will be at on the main body. Then, I labeled out where the toothpicks will be on (the spacing between each toothpicks). Next, I poke the parts with a needle because it is sharper than the toothpicks haha...
I cut off the sharp part of side on the toothpick with a cutter:
 |
| Oops I cut a bit too far hahaha... |
And then using the cut toothpick, I poke through the same hole left by the needle.
To secure the toothpick with the main body and the wire, I used glue gun to secure everything.
So, it is up to us to decide how the upper side will look like. Anyways, I managed to cut out the parts of the handcanon:
The blue arrows indicate how the orientation of the cardboard should be like, where the lines on the cardboard should be parallel to the arrows -- note that my top cardboard is in the wrong orientation hahahaa.... I had a hard time to keep the cardboard bent OTL.
Ah, I didn't take the picture of the side of the hand canon but note the green arrows. The green arrows on both the pictures should correspond to each other, and thus the cut out should follow as such. For the arrow that is pointing to the center of the top of the handcanon, that is where the "platform" will be made by pasting more cardboards one on top of the other until you reached your desired height difference.
For the handle, I simply used a triangular cardboard piece and stick it there first before I paper mache it later~
Similarly for the thigh canons, I cut the parts in a similar manner, just that it has less width, a bit more square and bigger. For the shooting tubes of both the hand canon and the thigh cannons, I rolled thick paper along with newspaper to reinforce the shape. Because the newspapers are long enough, I rolled the whole newspaper such that the rolled newspaper goes through the whole thigh canon. Attach them with Masking Tape and tadaah
For the thigh canon, I had to make a few adjustments here and there because I was unsatisfied with the props halfway. For example, if you see the picture above, you realise that the body of the canon is squarish. As we progress, well in fact after this part, I decided to make the edges less sharp.
For the rounded ends of the tubes, I simply crushed newspaper and stick them there with masking tape hahaha...
After that, paper mache it allllllllllllllllllllllllllllllll!
Reinforce the handle part of the handcanon with lots of layers of paper mache so that when it dries and hardens later, it doesn't fall off .
Now the detailing! Since there is no view of the handcanon from the top, I decided to model it after the thigh canon as well. The parts and the material I used are:
With the same method as how I attached the wires onto the main body, I used toothpicks and needles and then glue gun to attach the wires onto the top of the hand canon and the thighcanon. However for the thighcanons, I only used one toothpick to hold the wires because I will be using glue gun to hold the both of them together.
For the other details like the ''screws", I said screw it and lets just use glue gun to make the pattern. Which I did. hahaha XD
What's left is to paint it and figure out a way to attach this to our body. :D
6) For painting, I used spraypaint to paint most of the props.
Spray evenly in multiple thin coats! Remember to prime with primer before and after spraying! I didn't prime after spraying so later you can see the ugly paints chipping off my final product after usage haha...
Soon after a while I gave up spraying because some parts didn't turn out too well so I resorted back to Acrylic Paint and it works well too!
7) It took me quite a long time and lots of research to finally figure out a way to attach the main body onto my body without the attaching part being seen... If we were to follow the correct way, the main body is supposed to attach on the hips of Murasame by the hips. The problem was that I don't know what material should I use to make the attaching part such that it holds the main body stable, and that it stays securely on my hips when I move.
So I went online to search aaaaaaand finally found a way! The way was to....... use strings. Strings of the same colour as the costume so that they cannot be seen and thus mimic the ways at which our ship girls so miraculously carry the goddamn heavy ships.
The way I tied the string on the huge-ass thingy at the back prop was in a primary school-bag kind of way: the normal straps that will go around your pits and then strings that will be tied around your hips. I would just have the straps that go around my shoulder and pits but then it will still be unstable. So the string that goes around my hips will be the one that stabilizes the who structure, while the other will help to support the weight of the prop.
I poked through the prop using pins again, and then tied it into the prop itself. So if you were to look inside of the prop, it would look like this:
When worn, the huge-ass props should go like this:
However for the thigh props, I couldn't poke any holes because it was too hard and the tubes through the body made it extra hard for anything to poke through. Hence I just resorted to tape and glue gun, and strings and elastics. They are all to be tied onto my thighs:

Oh and also, to add in aesthetics and realism, I used white insulation tape on the base of the shooting tubes where it meets the body so that it looks like it can be adjusted and moved (although it cannot haha)

 b) Straps thingy at her thighs


d) Hand canon


f) Main prop: the huge-ass thingy at the back


- Kuroyori Haruka
 |
| This is what the main body should look like with the toothpicks, glue and the wires attached. |
 |
| Look inside! It's dangerous hahaha... |
Note that I attached the grills on the inside of the main body rather than the outside (because it'll look ugly).
Also, I used wires to add this part of the prop which I call, the "mini-ladder":
Lastly is the main body antenna. Easy, I used satay sticks and wires, with dental floss to tie the sticks together (resourceful aye), reinforced with glue gun. To attach to the main body, I used insulation tape in black, with glue gun reinforcements:
After that, we are pretty much done with the structure of the main body!
Hand and Thigh Canon
The hand canon is pretty ambiguous because we only have this to help us with:
On the bright side that is enough hints to tell us that the hand canon has these elements:
Also, I used wires to add this part of the prop which I call, the "mini-ladder":
 |
| The "mini-ladder" detail |
Lastly is the main body antenna. Easy, I used satay sticks and wires, with dental floss to tie the sticks together (resourceful aye), reinforced with glue gun. To attach to the main body, I used insulation tape in black, with glue gun reinforcements:
 |
| PS this photo was taken after the event just now so it is... broken. HAHA I will have to fix this part again.. But you get the idea. |
After that, we are pretty much done with the structure of the main body!
Hand and Thigh Canon
The hand canon is pretty ambiguous because we only have this to help us with:
 |
| Only the underside.... |
On the bright side that is enough hints to tell us that the hand canon has these elements:
 |
| Hand Canon |
So, it is up to us to decide how the upper side will look like. Anyways, I managed to cut out the parts of the handcanon:
 |
| Handcanon in its raw-est form |
The blue arrows indicate how the orientation of the cardboard should be like, where the lines on the cardboard should be parallel to the arrows -- note that my top cardboard is in the wrong orientation hahahaa.... I had a hard time to keep the cardboard bent OTL.
Ah, I didn't take the picture of the side of the hand canon but note the green arrows. The green arrows on both the pictures should correspond to each other, and thus the cut out should follow as such. For the arrow that is pointing to the center of the top of the handcanon, that is where the "platform" will be made by pasting more cardboards one on top of the other until you reached your desired height difference.
For the handle, I simply used a triangular cardboard piece and stick it there first before I paper mache it later~
 |
| Thigh Canon |
Similarly for the thigh canons, I cut the parts in a similar manner, just that it has less width, a bit more square and bigger. For the shooting tubes of both the hand canon and the thigh cannons, I rolled thick paper along with newspaper to reinforce the shape. Because the newspapers are long enough, I rolled the whole newspaper such that the rolled newspaper goes through the whole thigh canon. Attach them with Masking Tape and tadaah
 |
| Thigh canon (bottom view) |
 |
| Thigh Canon (top view) |
For the thigh canon, I had to make a few adjustments here and there because I was unsatisfied with the props halfway. For example, if you see the picture above, you realise that the body of the canon is squarish. As we progress, well in fact after this part, I decided to make the edges less sharp.
For the rounded ends of the tubes, I simply crushed newspaper and stick them there with masking tape hahaha...
After that, paper mache it allllllllllllllllllllllllllllllll!
 |
| Paper mache'd handcanon. Notice how I did the handle thing! |
Reinforce the handle part of the handcanon with lots of layers of paper mache so that when it dries and hardens later, it doesn't fall off .
 |
| Paper Macheeeee |
 |
| Dried! |
Now the detailing! Since there is no view of the handcanon from the top, I decided to model it after the thigh canon as well. The parts and the material I used are:
 |
| Materials used |
With the same method as how I attached the wires onto the main body, I used toothpicks and needles and then glue gun to attach the wires onto the top of the hand canon and the thighcanon. However for the thighcanons, I only used one toothpick to hold the wires because I will be using glue gun to hold the both of them together.
For the other details like the ''screws", I said screw it and lets just use glue gun to make the pattern. Which I did. hahaha XD
 |
| How to attach the wire onto the props |
What's left is to paint it and figure out a way to attach this to our body. :D
6) For painting, I used spraypaint to paint most of the props.
 |
| Spray Painting (1) |
 |
| Spray Painting (2) |
Spray evenly in multiple thin coats! Remember to prime with primer before and after spraying! I didn't prime after spraying so later you can see the ugly paints chipping off my final product after usage haha...
Soon after a while I gave up spraying because some parts didn't turn out too well so I resorted back to Acrylic Paint and it works well too!
 |
| TADAAAAA Paint done! |
7) It took me quite a long time and lots of research to finally figure out a way to attach the main body onto my body without the attaching part being seen... If we were to follow the correct way, the main body is supposed to attach on the hips of Murasame by the hips. The problem was that I don't know what material should I use to make the attaching part such that it holds the main body stable, and that it stays securely on my hips when I move.
 |
| hmmmmm still figuring out.... |
So I went online to search aaaaaaand finally found a way! The way was to....... use strings. Strings of the same colour as the costume so that they cannot be seen and thus mimic the ways at which our ship girls so miraculously carry the goddamn heavy ships.
 |
| String on the main body |
The way I tied the string on the huge-ass thingy at the back prop was in a primary school-bag kind of way: the normal straps that will go around your pits and then strings that will be tied around your hips. I would just have the straps that go around my shoulder and pits but then it will still be unstable. So the string that goes around my hips will be the one that stabilizes the who structure, while the other will help to support the weight of the prop.
 |
| There are 3 parts to the strings of which I've made on the prop. |
I poked through the prop using pins again, and then tied it into the prop itself. So if you were to look inside of the prop, it would look like this:
 |
| The inside of the huge-ass thingy at the back prop |
When worn, the huge-ass props should go like this:
 |
| The huge-ass thingy at the back when worn |
However for the thigh props, I couldn't poke any holes because it was too hard and the tubes through the body made it extra hard for anything to poke through. Hence I just resorted to tape and glue gun, and strings and elastics. They are all to be tied onto my thighs:

Note this though, although this method worked for me, this is definitely not a comfortable method. If you were to tie too tight, you might cut off the blood supply from your legs hahaha... So,... proceed with caution or if you have any other suggestions, do tell me? :)
Finally, the hand canons. I used elastics but I think strings are good enough. I glued the elastics to the extended part of the handle and then I sew it on to strengthen the hold so that it will not come out at all later. Glue gun alone is enough to be honest but I wanted something that goes through and holds both the handle and the elastic just to make sure, and sewing was the best method to me. I used 2 layers of elastics because it had better grip.
 |
| Handle of the handcanon |
Oh and also, to add in aesthetics and realism, I used white insulation tape on the base of the shooting tubes where it meets the body so that it looks like it can be adjusted and moved (although it cannot haha)
 |
| Underside of the Handcanon! |
8) Try it out!
If it's all good then we are done!! :D
Here are some of my photos with the props!
 |
| pic thanks: Khai Khai Photography |
 |
| Pic thanks: Nafie' Photography |
 |
| Pic thanks: Nafie' Photography |
 |
| Pic thanks: Nafie' Photography |
I hope that this, if not inspired you, have helped and gave you some ideas on how to make the props based on what I did. There are many many other better methods to making this props, with much more better materials that will give a better look and effect to the props. However, I was limited money-wise and thus resorted to all these methods. :)
(If you realise this props' material fee is like..... $15-ish? I just needed to buy paints, some stuff for details from Daiso and tapes.. and that's pretty much it? hahaha... )
Yeap.
Finally as promised, here are the dimensions:
a) Shoe antenna:


c) Anchor


e) Thigh canons


~~~~~~~~~~~~~~~~~~~~~~~~~~~~~~~~
That is all! If I missed out on anything or if you have comments, you can text me directly if you hace my number or e-mai me okay!
Thanks for visiting and good luck! :D
- Kuroyori Haruka